Moving to a new center

Did you have any time to fill this week? Did you fill it with song? Did you kill time or follow a form?

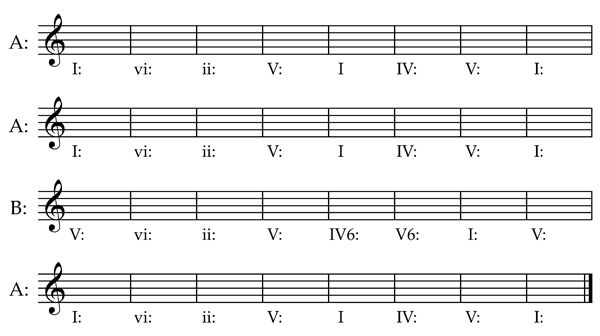
The key to filling larger blocks of time or creating large scale forms is the ability to move to different key centers. While staying in the same key is acceptable for certain styles and forms, even a simple ABA form can benefit from modulation to a different key.

Ready? Go!

The quickest way to change keys is to simply change keys! No preparation or transition necessary. This works well in tonal schemes when moving to a closely related key: tonic to dominant, major to relative minor, major to parallel minor, or vice versa. From C major, that enables us to simply move to G major, F major, A minor and C minor. If you are using a richer tonal palette (like Messiaen’s Mode 2), movements by thirds can work as well. This would add Eb major, F# major, A major, E major, and Ab major as possible direct jumps.

One Chord Transitions

A very common practice in some traditions is to modulate up for the final verse of a hymn. Often the easiest and quickest way to do this is with a deceptive cadence at the end of the verse, concluding on major chord on the flatted sixth degree of the scale. This makes the old tonic the leading tone for the new key one half-step higher and enables everyone to jump back in to the next verse with no further segue needed.

A dominant seventh chord can actually serve as a pivot point for a transition to any other key. While you might need a little more time to lock in the new key after the shift, I’ve made a handout available here showing the resolution from a G7 chord to all 24 major and minor keys.

In his Cours Complet d’Improvisation à l’Orgue, Marcel Dupré suggests using symmetrical chords for modulation. The diminished seventh chord built of minor thirds functions very much like the dominant seventh chord above, so I won’t elaborate further on it. The other symmetrical chord Dupré uses for modulation is the augmented triad. Built of major thirds, this is an unstable sound because it lacks a perfect fifth. The lack of stability helps create the motion to a new key, and once again this chord can get you to any other key that you would like. (See the handout here.)

Smooth Transitions

Of course, if you are not looking to shock your listeners, you may wish to take a little more time and venture through several keys before arriving at your final destination. Exactly how much time you can take will depend upon the form you are aiming to follow and the expected duration of your improvisation. Composer Max Reger offers a guide on how to modulate from one key to another, even providing different progressions for enharmonic key relations! In his book Modulation, he offers 46 potential progressions from a major key and 54 progressions from a minor key. If you don’t know how to get from one key to another, this is the place to look. If your time is short, you can employ his progressions as they are. If you have more time, you can create a phrase in the key for each of the chords of his suggested progressions. The key to smooth transitions will be to use melodic thematic material whenever possible. Referencing familiar musical material will make it easier for the listener to accept and process the harmonic changes. By playing thematic material in different keys, you will also be practicing skills necessary for larger forms such as sonata allegro or fugue!

May your move from one place to another pass smoothly!

Glenn


Recent additions to organimprovisation.com:

Organists:

Mode:


Newsletter Issue 26 – 2014 10 27
See the complete list of past newsletter issues here.
Sign up to receive future issues using the box to the right on this page.

Are you killing time or following a form?

No one likes to wait, and silence can be deadly.
When that unexpected silence arrives in a church service, who is asked to fill the void?
Why, it’s the organist, of course!
This might mean extending a piece for a few more measures, or it might mean creating a new piece just long enough to fill the gap (even when you don’t know how long that gap might be).

Aimless Wandering

At the most basic level, any organist should be able to fill time. Creating an additional repeat in a written piece of music or even starting again at the beginning and bringing the piece to a successful cadence when the time is up are the simplest ways to start. While I recommend aimless wandering as a way to explore new modes or when searching for your own harmonic language, when the organist just meanders meaninglessly around the keys to fill time, it becomes killing time and I think silence might actually be a better option.

Following a form

The much better option is to actually follow some sort of form in the extension that you need to create, or if you expect to have the time for an entire piece, then you definitely need to have a form in mind. I find one of the easiest and most flexible forms is AABA or song form. There are many hymn tunes that follow this form (HYMN TO JOY and NETTLETON to name only two), and unless your B section is radically different, there’s a good chance that you can end your piece at the end of any section without too much concern.

Simple Structure

If you are in need of an extension, the easiest material to use for the A section is a phrase or idea from the piece you just played. If you need to start from scratch, here is a simple harmonic scheme that you can follow:
AABASimple

You could plan out more elaborate structures according to your ability level, and of course, this can be adapted for any key or time signature. One easy way to stretch this form would be to double the phrase length to eight measures. For example:
AABADouble
At a moderate tempo, either of these examples could provide you with 1-2 minutes of music. I prepared a PDF that you can download here to print both of these on one page to take to the console and practice. Feel free to create your own patterns to practice the form.

Longer Songs

Once you are comfortable creating a 16 or 32 measure song form, you can then practice stringing them together to create a larger ABA or even AABA form. If you choose to follow a larger AABA form, be sure to differentiate your two A sections by changing the accompaniment pattern or the register of the melody or perhaps even both. By doing something slightly different, you help to keep the listener involved with the piece. By using the same material again, you will be making your job as an improviser easier, so it becomes a win-win situation for everyone!

Silence can torture, but so can rambling aimlessly. If you have a gap to fill, make sure you are following a form rather than just killing time.

May all your songs be filled with beautiful melodies,

Glenn


Recent additions to organimprovisation.com:

Organists:

Theme:


Newsletter Issue 25 – 2014 10 21
See the complete list of past newsletter issues here.
Sign up to receive future issues using the box to the right on this page.

Shifting Gears

Yesterday, I had the opportunity to play part of a Sunday Matinee concert at the Cathedral Church of St. Luke in Orlando, Florida. I opened the program with one of my own compositions which I had written as a gift for the music director at the Cathedral. For the rest of my portion of the program, I was to improvise on hymn tunes suggested by the audience. While several people offered compliments to me after the concert was over, I actually discovered something that I’d like to offer as a practice tip for this week.

Random Selection

If you ever accept theme suggestions from the audience, you have to be prepared for just about anything. By requesting that people submit something from the hymnal for the drawing, we made an attempt to limit the realm of thematic material I would be working with. When I showed up to practice, I would open the hymnal randomly and improvise on whatever tune was in front of me, so I thought I had covered this random selection process well in my preparation. By asking for the person’s favorite hymn, I also suspected that many of the suggestions would be familiar tunes that I had practiced before. (Now that I have the complete set of index cards with the audience submissions, I have a few tunes to add to the list of hymn and chorale themes at organimprovisation.com.)

Caught off Gaurd

Having improvised on a submitted theme at the end of numerous other concerts in addition to improvising multiple pieces for church services every week, I thought Sunday’s task of filling 15-16 minutes with improvisations on potentially four different themes would be easy. After all, that’s really only 4 minutes each. A simple ABA form or even an ornamented chorale variation could take that long, and I’ve done those every week for years. What I failed to realize was the time compression that was required for the concert. Rather than knowing the hymns for the week several days in advance and having other elements of the service to provide time for reflection in between improvisations, I now basically had to choose an order of the themes, and improvise the equivalent of the prelude, offertory, communion, and closing voluntaries all strung together. No breaks.

Shift

My challenge became not how fast can I play, but how fast can I mentally change gears? Whether you break out the metronome and ratchet up the speed gradually or look for efficiencies while playing slowly, physical technique for speed seems a lot easier to tackle than mental agility. While I’m still contemplating how I could have better prepared for yesterday’s mental challenges, here are a few ideas that I plan to practice before doing this again:

  1. Practice improvising while watching the clock. Choose not only a theme and form, but also a duration and make sure the improvisation runs for the allotted time.
  2. Open the hymnal at random, count to ten, then start! Practice giving yourself the least amount of time possible between discovering the theme and starting to play.
  3. Use a random number generator (like http://www.random.org/) to generate a list of page numbers from the hymnal. Improvise on each of the tunes in the order given on the list.
  4. Practice in “performance mode.” No stopping. No redos. Play straight through from start to finish.
  5. Set a timer to beep every two minutes (or an even shorter interval). Every time it beeps, change theme, change key, and/or change form. Practice this doing dramatic shifts as well as doing more subtle shifts.

One of the practice ideas I heard in a masterclass with Tom Trenney was to make a deck of cards with forms or improvisation techniques written on them and then to draw randomly from the deck to see what you would improvise. I think you could also have a deck of themes and even a deck of keys/modes. The weakness I discovered at yesterday’s concert was not with any of the cards that were in the deck, but in my ability to flip from one card to the next quickly.

The Fix

The remedy I see at the moment is to use a timer to force me to change ideas quickly. We are all used to practicing with a metronome for technical speed, so why shouldn’t we use something to measure our mental speed? How else can we train ourselves to think faster? I’d love to hear any ideas you might have.

Hoping all your improvisations shift gears smoothly!

Glenn

PS. In case you’re wondering, the four hymns that were selected by the audience were Holy, Holy, Holy (NICAEA), Be Thou My vision (SLANE), Rock of Ages, and All Creatures of Our God an King (LASST UNS ERFREUEN). What would you have done with these themes?


Recent additions to organimprovisation.com:

Organists:

Mode:

Theme:


Newsletter Issue 24 – 2014 10 13
See the complete list of past newsletter issues here.
Sign up to receive future issues using the box to the right on this page.

How Fast Can You Play?

Over the years, I’ve been fortunate to study with many different improvisation teachers. The encounters have been in short masterclass lessons, intensive workshop immersions, and regular weekly lessons. Only once, however, has a teacher ever made an attempt to asses my improvisation skill level.

I met Franck Vaudray when I was in Lyon to audition at the conservatory (CNSM). I was in town on Sunday morning, so made a visit to St. François de Sales. I sat in a pew for mass and went up to the organ afterwards, expecting to find Louis Robilliard and planning to ask what pieces he had played. Instead, that’s when I met my next improvisation teacher.

Franck Vaudray

As I arrived at the organ while he was still playing the sortie, I instantly discovered that I was hearing an improvisation. No score by César Franck was on the music rack. (I had dismissed Charles-Marie Widor as an option once the canon appeared.) After we exchanged introductions, I learned that he also had improvised the lovely baroque trio sonata movement at the offertory. These improvisations were both so polished that they could have been written pieces, so when he offered to take me as a student, I was more than happy to begin commuting to Lyon for lessons whenever I could.

The Evaluation

When I came back to St. Fraçois de Sales a few weeks later for my first lesson with Franck, he started by placing a piece of paper on the music rack with something like the following written on it:
FranckAtonal
(I had the original paper for many years, but it seems to have gotten lost in my last move.)

My instructions were to play single notes as fast as I could with my hands in an atonal style and then add in the theme in long notes with the pedals. While the instructions may seem simple, it can be very easy to fall into tonal patterns if you are not careful with the hands. Likewise, this duo may not seem very impressive, but with all the foundations and swell reeds coupled together, it could be the start of a very nice toccata!

Increasing Difficulty

So ends the easy part. Every step thereafter basically served to make the task more difficult. It’s hard for me to remember the exact sequence of steps, but here’s a few basic ideas of what I went through:

  1. Increase to trio texture. Both hands play independent atonal lines of fast notes. No rests allowed. Pedal plays them in long notes.
  2. Duo: Right hand and pedal alone, but this time, play the theme in retrograde (C, E, F#, Eb…)
  3. Duo (left hand and pedal) with the theme played from the outside in (G, C, Ab, E, F, F#…)
  4. Duo (both hands and pedal) with the theme from the inside out (A, Bb, Eb, D, F#, F…)
  5. Duo with the theme inverted (octave transposition permitted so as to not run out of notes) so it becomes: G, F#, A, C, E, F…

Is your brain tired yet? Now, it’s time to do it all over again, but this time observe the numbers as the duration of the notes of the theme. Starting again with the basic theme, this means that you would play five notes with the hands for the G in the pedal, followed by ten for Ab, seven for F, six for D, and so forth through the entire theme. I’m guessing this will slow you down a little, because it certainly decreased my speed! Be sure you go through all the retrograde, in-out, out-in, and inversion steps following the numbers as well.

Texture Inversion

For the final task, I could disregard the numbers (Yeah!) and was told to start again with long notes in the pedal and fast notes in the hands. Instead of ending after playing once through the theme, however, I was to continue playing more notes of shorter and shorter duration with the feet while the hands were to play longer and longer notes until eventually I managed to reverse the texture and could play the theme in long notes (in octaves) with the hands while the feet played the quick atonal notes. Here was the final speed test: how fast could my feet move?

To Be Continued

So that you can try this easily yourself, I created a pdf with the theme and instructions above that you can download here and print to take with you to the console. How fast can you play? Is it easy to play atonal lines with your hands? How about with your feet?

These exercises turned out to be only the first part of my first lesson with Franck Vaudray. We continued on for at least an hour more through challenges involving dictation, motives, transposition, canons and harmonization. (If I can find the sheet he gave me as homework, I’ll share more of these in a future newsletter.) I walked out of St. Fraçois de Sales mentally exhausted. When was the last time you tested your improvisational limits?

Hoping your improvisations set new speed records!
Glenn


Recent additions to organimprovisation.com:

Organists:

Mode:


Newsletter Issue 23 – 2014 10 06
See the complete list of past newsletter issues here.
Sign up to receive future issues using the box to the right on this page.

Mixolydian Mode

MixolydianMode
The Mixolydian mode is Mode 7 of the church modes used in Gregorian chant. In modern terms, it is most easily described as the scale from G to G using only the white notes of the piano. In order to construct the scale starting on other notes, follow the pattern ascending from tonic: whole step – whole step – half step – whole step – whole step – half step – whole step.

A handout showing the mode starting from all twelve notes is available here.

The Mixolydian mode is considered a major mode because of the major third above the tonic. It differs from the major scale by having a lowered seventh degree. The ancient Greek Mixolydian mode in the diatonic genus resembles the Locrian mode rather than the ecclesiastical Mixolydian mode.

Some themes in the Mixolydian mode include:

  • Asperges me
  • Puer Natus Est
  • In Paradisum

Twenty ways to improvise on a hymn

As this issues is number twenty in the series of newsletters, I thought I’d offer a simple and practical list of twenty ways to practice a hymn that you can make part of your regular routine. Depending upon your experience level, some of these might be considered warm-up exercises while others will hopefully help you expand your improvisational toolbox. While I typically only give hymn melodies on the website here, I’m writing this list with the presumption that you have a four-part harmonization in front of you, so break open the hymnal and get started!

  1. Transpose the hymn to all the other major or minor keys.
  2. Play the hymn in other modes: change major to minor (or vice versa). Try Dorian, Phrygian, Lydian, and Mixolydian (coming this Friday) as well.
  3. Invert the soprano and alto parts. (If this is your first effort at doing this, don't worry about parallel fifths for this or any of the other exercises on this list. Simply play the notes on the page.)
  4. Play the melody in the tenor (left hand) with the right hand playing the alto and tenor parts up an octave. Play the bass either with the left hand or pedals.
  5. Play the melody in the tenor(left hand) with the right hand playing the tenor part above the alto part. Again the bass can be played with the left hand or pedals.
  6. Use an 8' stop in the pedal to play the melody in the tenor register. Play the bass with the left hand while the right hand fills in from the tenor and alto parts.
  7. Play through the hymn harmonizing each melody note as each of the following functions: tonic of a major chord, tonic of a minor chord, third of a major chord, third of a minor chord, fifth of a major chord, fifth of a minor chord, tonic of an augmented chord, tonic of a diminished seventh chord. (See Issue #7 for an example.)
  8. Rather than applying one type of chord throughout the entire hymn, choose a numeric sequence (such as 1-3-5, all in major) and follow the same idea as above. You could also follow a more complicated sequence, such as 1M-3m-5M-1m-3M-5m. While the progressions might not make much sense harmonically, this will help you think and shift between keys quicker.
  9. Play the melody as a two-voice canon at the distance of one note, a half-measure, and a full measure. Each of these canons can be practiced starting with the right hand, left hand or pedal creating six different combinations for each distance.
  10. Choosing the distance than works best, play through the canons again, but at different melodic intervals.
  11. Play a monophonic variation arpeggiating the chords in triplets or sixteenth notes. Be sure and try different figurations where the melody note is not always the first note of the arpeggio.
  12. Create a duo where the top voice is the melody and the bottom voice plays eighth notes (two notes for every melody note).
  13. Create a duo where the top voice is the melody and the bottom voice plays triplets (three notes for every melody note).
  14. Create a duo where the top voice is the melody and the bottom voice plays sixteenth notes (four to one).
  15. Repeat steps 12 to 14 with the melody in the lower voice and the more active voice above the melody.
  16. Repeat 12 to 14 but rather than ornament the bass, ornament the melody. Instead of a duo, you may choose to play the full ATB harmony as in the hymnal as the accompaniment.
  17. Create echo passages by changing manuals (or registration) and repeating short sections of phrases, i.e. for a two-measure phrase, repeat the second measure, and then repeat the last half-measure again.
  18. Change the meter from duple to triple (or vice versa). How many different ways can you shift the meter? For example, one measure of four can become two measures of three or one measure of three.
  19. Change the meter to 5/4, 7/8 or some other odd (but consistent) meter.
  20. Improvise a toccata following the plan from the newsletter sign-up handout!

Many of these steps can be done at the piano and do not require a significant chunk of time, so I encourage you to practice as many of them as often as you can. If you can’t practice all twenty daily, choose as many as you can and practice them for twenty days and then move on to another set. Slowly over time, your improvisational skills will grow.

May your improvisations be better each day,
Glenn


Recent additions to organimprovisation.com:

Organists:

Mode:

Theme


Newsletter Issue 20 – 2014 09 15
See the complete list of past newsletter issues here.
Sign up to receive future issues using the box to the right on this page.

Lydian mode

LydianMode
The Lydian mode is Mode 5 of the church modes used in Gregorian chant. In modern terms, it is most easily described as the scale from F to F using only the white notes of the piano. In order to construct the scale starting on other notes, follow the pattern ascending from tonic: whole step – whole step – whole step – half step – whole step – whole step – half step.

A handout showing the mode starting from all twelve notes is available here.

The Lydian mode is considered a major mode because of the major third above the tonic. It differs from the major scale by having a raised fourth degree, though some chants will use a B-flat negating any difference between this mode and the major scale. The ancient Greek Lydian mode in the diatonic genus resembles the major scale rather than the ecclesiastical Lydian mode.

Some themes in the Lydian mode include:

Videos:
Olivier Latry – Improvisation on The Simpsons Theme – Toronto

Learning Modes Two

I am always doing that which I cannot do, in order that I may learn how to do it.
― Pablo Picasso

Last week we looked at the Dorian Mode. In addition to proposing some exercises to help you practice it, I mentioned how we each have a preferred sensory method for learning, either visual (seeing), auditory (hearing), or kinetic (touching). As musicians, there would seem to be a bias towards learning through listening, however I know I am a strong visual learner: if I try to play a piece I know from a different edition of the score, it feels like I’m learning it all over again! I’ve always known that one of the greatest hurdles to improvising is the the fear of not having a score on the music stand, but perhaps that’s related to a person’s learning mode more than not knowing what to play? Which mode do you favor when learning music? Is it different from how you might learn other subjects?

Global or Detail

Are you a big picture person? How closely do you pay attention to details? If you are giving directions on how to get somewhere for someone, how much detail do you provide: general guidance (left at the end of the street, then left at the third light) or turn by turn instructions with descriptive landmarks (left when the road ends at the airport, through three lights, crossing route 50, turning left on Maguire after passing the mall before entering the next subdivision)?

I recognize that my first approach to an area is from the big picture perspective. You can call this “Ready, Fire, Aim.” (There’s even a book by this title: Ready, Fire, Aim: Zero to $100 Million in No Time Flat about building a business this way!) Want to learn to improvise? Start by sitting down at the bench and playing. Next step, refine what you played into something better. This is how to get over that first hurdle of playing without a score in front of you. The big picture viewpoint to to simply start playing something. Afterwards, we aim for improvement and choose a direction to focus our attention.

The detail oriented perspective requires more preparation. For example:

  1. Choose a mode to learn (Phrygian)
  2. Play the tonic of the mode in the lowest octave of the pedal on soft 16′ & 8′ stops
  3. Play a quarter note ostinato pattern with the left hand on soft 8′ foundations – perfect fourths with the top note melody being E-F-G-F.
  4. Finally add a melody on a solo stop played by the right hand.
  5. Begin the melody on something other than tonic. Create a four measure phrase before arriving at tonic.
  6. Create a second four measure phrase that contrasts with the first phrase.
  7. Conclude by repeating the first phrase.

See the example below for a sample start following the detailed instructions above:

PhrygianOstinatoStart

In some ways, the detailed approach can provide more success, but it also leaves less room for creativity. What happens when we play a note outside the mode with our right hand? Do we stop? Is that instantly a bad improvisation? Do we brand ourselves a failure and never improvise again? Of course not! Sometimes a little slip can focus our attention and help us move into flow making an even better overall performance!

Teaching and Learning

The best teachers are able to meet the student where he or she is and open doorways to new areas of learning, providing the right amount of detail to enable the student to step through those doorways. In the end though, it is up to the student to step through the doorway. Are you practicing your improvisation skills? Are the instructions I am providing detailed enough for you or are they too general? What else can I do to help you become a better improviser? If these posts are helpful, please sign-up for the newsletter or take a moment to let me know more about you and your interests in improvisation by leaving a comment below. The more I know about you, the more useful this newsletter and website will become.

Whether working from generic or detailed plans, hoping all your improvisations are masterful,
Glenn


Recent additions to organimprovisation.com:

Organists:

Mode:

Themes


Newsletter Issue 19 – 2014 09 08
See the complete list of past newsletter issues here.
Sign up to receive future issues using the box to the right on this page.

Phrygian Mode

PhrygianMode
The Phrygian mode is Mode 3 of the church modes used in Gregorian chant. In modern terms, it is most easily described as the scale from E to E using only the white notes of the piano. In order to construct the scale starting on other notes, follow the pattern ascending from tonic: half step – whole step – whole step – whole step – half step – whole step – whole step.

A handout showing the mode starting from all twelve notes is available here.

The Phrygian mode is considered a minor mode because of the minor third above the tonic. It differs from the natural minor scale by having a lowered second degree. This makes the chord built on the dominant a diminished triad, so final cadences tend to be vii – i or iv – i. While named for an original Greek mode, the ecclesiastical Phrygian mode actually resembles the Greek Dorian mode (and vice versa).

For suggested ways to practice a mode, please read the newsletter issue on Learning Modes.

Some themes in the Phrygian mode include:

Learning Modes

“I am always doing that which I cannot do, in order that I may learn how to do it.”
― Pablo Picasso

Learning to do something requires us to step beyond our comfort zone. Just as hearing someone describe a watermelon to you will not allow you to taste it, reading about improvisation does not allow you to become an improviser. At some point, it is essential to sit down at the keyboard and, as Nike encourages us, “Just do it.”

How to Learn

Some people learn best by watching someone else do the task first. Others need to hear someone give an example. This is one of the reasons why I include YouTube videos at organimprovisation.com. While all of the videos provide auditory examples, when I am searching for videos to include, I will give a preference for those where you can see the player’s hands at the keyboard as well. I know from my own personal experience that it has been very helpful in my learning process to be able to see exactly how someone is creating the sounds that I am hearing. The organ offers so many different sound combinations and such complex sounds (through the use of mixtures and other upper work), that a quick glance to see where the hands are at the keyboard can settle many questions that the ear might have posed. I remember even my teacher peering around the corner once after I had been asked to improvise with my left hand and feet alone. I’m sure he was checking to make sure I didn’t slip my right hand into the texture!

Some people also learn best by touch. You can explain to them and show them, but until they can use their hands and do it for themselves, their learning will be incomplete. For me, this is where scales, arpeggios, cadences and other progression exercises help train us as improvisers. Any one who has ever memorized a piece of music is familiar with the idea of muscle memory. We need to find ways to train and take advantage of this muscle memory when we improvise as well. Knowing our muscles know where to go next frees up brain power for us to focus on form or any of the other elements we need to consider as improvisers.

Modes

As a young piano student, I learned to play all the major and minor scales, along with arpeggios, chords and cadences. These drills helped build technique and were my introduction to harmonic theory. If you have not learned to play scales, arpeggios, chords and cadences (I-IV-I-V-I) in all the keys, I strongly urge you to do so. While I have most often done these at the piano, we shouldn’t forget to practice them with our feet as well. Go as slowly as you need to in order to play accurately, then you can work for speed.

While the major and minor scales are part of most every musician’s formation, other modes are frequently omitted or only touched briefly. As an improviser, I believe the more tools we have in our toolbox, the better we will be prepared to improvise on any given theme. For this reason, I’d like to recommend spending some time getting to know other modes as well as we know the major and minor modes.

Dorian Mode

As mode number one in the codification of the church modes used for Gregorian chant, I’d like to start with the Dorian Mode. It differs from the natural minor scale by having a raised sixth degree.

DorianMode

Rather than playing minor scales this week when you practice, how about playing the Dorian mode? Be sure you can play the mode starting from each of the different pitches. If you need to verify or want to have a reminder in front of you, I prepared a pdf that you can download here.

Aside from scales, here are a few other ways to practice and learn the Dorian mode:

  1. Play the same arpeggios, chords and cadences that you would play when practicing a major or minor scale.
  2. Practice any other technical exercises that you might normally do (Czerny or Hanon for example) in the Dorian mode.
  3. Change the key signature for a hymn to the equivalent Dorian mode signature. This will be easiest with hymns that have no accidentals, but you could also try with more complicated hymns.
  4. Create melodies in the Dorian mode. Be sure to include the scale degrees that make it different from the natural minor so that you can learn to hear the difference.
  5. Practice the Dorian mode in different keys by playing a pedal point on the tonic and chords or melodies with the hands. After 1-2 minutes, change the pedal point and tonic to a new key.

What else can we do to get the Dorian mode into our ears and fingers?

In the coming weeks, I plan to include posts about other modes on the website, explaining how they are constructed and identifying themes that are in the mode. All of the suggestions for the Dorian mode today can be (and should be) applied for each of the other modes that will be presented in the weeks to come. Part of creating colorful improvisations is the ability to use different modes. Regardless of how you might choose to go about learning the modes, be sure to find a way to include them in your improviser’s toolbox.

Hoping you will venture into new territory in order to learn more,
Glenn


Recent additions to organimprovisation.com:

Organists:

Mode:

Themes


Newsletter Issue 18 – 2014 09 01
See the complete list of past newsletter issues here.
Sign up to receive future issues using the box to the right on this page.